Wednesday, 27 February 2013

How To Add Animated Favicon In Blogger?


How to Create Animated Favicons ?


1. Go to favicongenerator
2. And just at the bottom of the page upload your blog logo, image or icon you wish to make as
    your favicon and also add your blog or website title as the scrolling text. You will find all
    the help at favicongenerator


3. Press the Generate Favicon Button and you will go to other page like this,


Here you will see many images just right click the animated one and save it to your computer.

4. Now upload the image to your Image hosting account.like Picasa , shareapic , Photobucket etc. what is the correct URL of ur image.


How To Add Your Favicon To Blogger


1. Go to blogger > Design > Edit Html
2. Press Ctrl+F search for <b:skin>
3. copy the code which is shown below and paste before the <b:skin>

<link href='ADD YOUR FAVICON LINK HERE' rel='icon' type='image/gif'/>

4. Replace ADD YOUR FAVICON LINK HERE with the image URL of the favicon you uploaded

5. Save your template and you are done!

Read More ->>

Links Hover and Rollover Effects for Bloggersbl


Add an identity to your Blog by customizing the text links in your post title/posts and sidebars with nice rollover effects, colors and highlights. Learn how to remove the underline under the links. For the purpose of this article, I have changed my template such that you will see a different text colors when your cursor is over the links, and highlighted background color when the cursor is over the post title. In this article, we shall discuss the common effects that you can create for your Blog.

Change Blogger Post Title


If you want to change link color, visited link color or hover/mouse over style for the post title.
Go to Blogger > Design > Edit Html search for                       (Tip: Press CTRL+F)
.post h2 a
and add the styles and effects after that...

Add link style in blogspot body search for              (Tip: Press CTRL+F)
a {

Overview of Link Styles


Blogger templates use Cascading Style Sheets (CSS) to define how the pages should be displayed. There are four basic style sheet entities for links;

a:link { }
a:hover { }
a:visited { }
a:active { }
a:link defines the style for links such that they stand out from the rest of the normal text.
a:hover defines the style readers see when their cursor or mouse moves over the links.
a:visited defines the style for links that have been Clicked or Visited.
a:active defines the style to an activated element.
The common rollover effects and styles that can be inserted into the {  } are;

color: #xxxxxx;
Changes the color of the text. By far the most common and effective style. For a list of color codes to be inserted in the xxxxxx, Color Code Generator and Color Wheel

text-decoration: none;
text-decoration: underline;
text-decoration: overline;
text-decoration: line-through;
text-decoration: blink;
Set to "none" to remove the underline under the link. Set to "overline" if you want a line above the text or set to "underline" for a line below the text.

font-weight: normal;
font-weight: bold;
font-weight: bolder;
font-weight: lighter;
By default, the font is "normal", So there is really no need to set it as that unless all your text is in a bold font and you want your hover links to be in the normal font.

font-style: normal;
font-style: italic;
A common style used is "italic" for the hover links.

font-family: Verdana,Arial;
The "Verdana,Arial" font is just an examle. You can insert the font family names or generic family names that you want as the typeface for the links.

font-size: 85%;
font-size: 10px;
font-size: small;
font-size: medium;
font-size: large;
font-size: smaller;
font-size: larger;
For percentages and fixed font size, you can specify the values accordingly.

background-color: #XXXXXX;
With this, the background of the text link will be highlighted. Color Code Generator and Color Wheel

text-transform: uppercase;
text-transform: lowercase;
This changes the letters of the link either to uppercase or lowercase.

border-style: none;
border-style: hidden;
border-style: dotted;
border-style: dashed;
border-style: solid;
border-style: double;
border-style: groove;
border-style: ridge;
border-style: inset;
border-style: outset;
This gives you a border around the link.

border-color: #XXXXXX;
If you have a border, you may want to specify the color of the border.Color Code Generator and Color Wheel


Change Link Styles in Template


Under Template: Edit HTML You will be able to find the first 3 stylesheet entities or lines that look like these:-

a:link {
color: #xxxxxx;   < default link color
text-decoration:none;
}
a:visited {
color: #xxxxxx;   < visited link color
text-decoration:none;
}
a:hover {
color: #xxxxxx;   < hover / mouse over color
text-decoration:underline;
}
Changing these 3 will do significant wonders to the appearance of your Blog. you can adjust the colors of the links, visited links, and hover links through Template > Fonts and Colors. You can manually insert the color values too. Look at these examples and see the effects to understand what you can do to your Blog.

EXAMPLE 1
a:link {
color: #0080ff;
}
a:visited {
color: #e10000;
}
a:hover {
color: #289728;
}


EXAMPLE 2
a:link {
color:#0080ff;
}
a:visited {
color:#e10000;
}
a:hover {
color:#289728;
font-size: 120%;
}
In addition to the green, this link is also bigger font when your mouse over it


EXAMPLE 3
a:link {
color: #0080ff;
}
a:visited {
color: #e10000;
}
a:hover {
color: #2D8930;
font-family: monospace;
font-weight: bold;
font-size: 120%;
background: #ffff66;
text-decoration: blink;
}
This hover link has a combination of styles a different font family, bold and bigger font, highlighted background, and it blinks when you hover the mouse over it
Read More ->>

How To Change Heading Style In Blogger


Customizing Heading Style Using Simple CSS


Add one of the above Heading Style to your Blogs, do the following,

Go to Blogger > Design > Edit HTML
Search for ]]></b:skin> (Tip:- Press Ctrl + F)
Just above ]]></b:skin> paste one of the codes below,

For Heading Style with a bottom border, use this code,
.post h4{
color:#0080ff;
border-bottom:1px solid #289728;
font-size: 12pt;
padding:2px;
}

For Heading Style with a border at top and bottom, use this code,
.post h4{
color:#0080ff;
border-top:1px solid #289728;
border-bottom:1px solid #289728;
font-size: 12pt;
padding:3px;
}

For Heading Style surrounded by borders, use this code,
.post h4{
color:#0080ff;
border:1px solid #289728;
font-size: 12pt;
padding:2px;
}

For Heading Style with Hover Effect, use this code,
.post h4{
color:#0080ff;
border-top:1px dotted #289728;
border-bottom:1px dotted #289728;
font-size: 12pt;
}
.post h4:hover{
border-top:1px dotted #0080ff;
border-bottom:1px dotted #0080ff;
background-color: #289728;
color:#fff;
}

For Heading Style surrounded by a Box, use this code,
.post h4 {
border-bottom: 1px solid #289728;
color:#0080ff;
font-size:12pt;
}
.post h4 span {
position: relative;
left: -0.3em;
bottom: -0.6em;
padding: 1px 0.5em;
margin: 0;
border: 1px solid #289728;
background-color: #fff;
}

For Heading Style with a side Image & Hover Effect, use this code,
.post h4 {
background: #fff url(URL OF Side Image) top left repeat-y;
font-size: 12pt;
color: #0090ff;
padding:28px 0 0 44px ;
}
.post h4:hover {
color: #289728;
}
Make sure you replace URL OF SIDE Image Link of your preferred side image.This image can be 45px by 45px in size or even smaller. Now save your template.......

Customization and Implementation of The CSS Code for Headings


All the CSS codes above use simple properties which are described below,

For Changing border width, style and color edit codes  border:1px solid #0080ff
1px refers to border thickness/width and solid refers to border style and the six digit number refers to border color. you can change border style from solid to dotted or dashed. You can use color code generator for getting the six digit number for your desired color.

For Changing Font Size, edit codes like this one,   font-size:12px

To Change Font Color, edit similar codes like this, color:#0080ff  You can use Color Code Generator and wheel

Implementation:-
Now whenever you write a heading in your post inside blogger editor, simple add following pieces of codes next to your heading.
<h4>Your Heading Goes Here</h4>
NOTE:- Changes will not appear inside blogger editor or on previewing. You will only see a bolded black text inside blogger editor. The Styling will take effect only when the post is published.


For Heading Style Surrounded By a Box you will need to add slightly different code as show below,
<h4><span> Your Heading Goes Here </span></h4>
You only need to add an extra span tag, for the box to appear.
Read More ->>

How To Make HTML Tables In Your Blogger/Website


How To Make Table?
  1. First you Click on Quackit For Generate HTML Table Code
  2. Now Follow Image For learn in Detail


  1. Change border colour to click on choose colour
  2. Now Change number of rows i.e 2 , 9, 6 etc
  3. Leave the Cellspacing Box
  4. Change the number of coloumns according to your requirements
  5. Leave the box Cellpadding
  6. Now you
    can change the value of border shadow if you select 1 then shadow will
    appear if select 0 valur then border will not show
  7. Choose the Border colour by clicking on Choose Colour and select your favourite colour
  8. After doing above work then click on Generate Table Button
  9. Preview will be appear below Generate Table Button
  10. Now you can copy the Code Which contain HTML Language
I have paste here the table code of  5 rows and 3 coloumn With White Colour 

    <table border="1" bordercolor="#FFFFFF" style="background-color:#FFFFFF" width="100%" cellpadding="3" cellspacing="3">

        <tr>

            <td>Table Cell</td>

            <td>Table Cell</td>

            <td>Table Cell</td>

        </tr>

        <tr>

            <td>Table Cell</td>

            <td>Table Cell</td>

            <td>Table Cell</td>

        </tr>

        <tr>

            <td>Table Cell</td>

            <td>Table Cell</td>

            <td>Table Cell</td>

        </tr>

        <tr>

            <td>Table Cell</td>

            <td>Table Cell</td>

            <td>Table Cell</td>

        </tr>

        <tr>

            <td>Table Cell</td>

            <td>Table Cell</td>

            <td>Table Cell</td>

        </tr>

    </table>
    <p style="font-family:verdana,arial,sans-serif;font-size:10px;"><a href="http://www.quackit.com/html/html_table_tutorial.cfm" target="_top">HTML Tables</a></p>


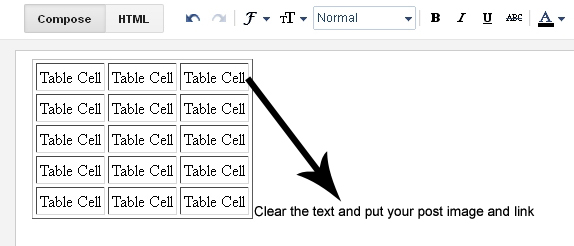
    • Now goto your post area and click on HTML Button then paste above HTML Table Code As shown in Below Image
    • After that click on Compose Button and result will be show as shown in below image


     Demo Here

      Table Cell Table Cell Table Cell
      Table Cell Table Cell Table Cell
      Table Cell Table Cell Table Cell
      Table Cell Table Cell Table Cell
      Table Cell Table Cell Table Cell


      • Now you should customize the table for put your software,games or etc post in table
      • Follow Images
      • Remove Table Cell text and put your Post
      • Table automatically expand when you put your image in table


      • Enjoy and Like us on Facebook for Recieve daily updates
      Read More ->>

      Tuesday, 26 February 2013

      How To Add Fancy Buttons in BloggerBl


      Links are very common on blogs, But many blogger's don't realize the power that they have with CSS to manipulate and manage their links effectively.

      This article will show you how to create Live Demo, Download, Homepage fancy buttons using simple CSS. It is much better to use this technique than to use image buttons because you can apply the style to any link and at the same time you don't have to create an image for each button which makes your blogs take longer to load. There is a CSS style that can help you create a button like effect easily with CSS.


      STEP 1. How To Add Live Demo, Downlaod Buttons To Blogger


      1. Go to your Dashboard > Edit HTML
      2. Search for ]]></b:skin> before it paste the following CSS Code.
      .button {
      -moz-border-radius:5px 5px 5px 5px;
      -webkit-border-radius:5px 5px 5px 5px;
      border-radius:5px 5px 5px 5px;
      -moz-box-shadow:0 1px 3px rgba(0, 0, 0, 0.25);
      -webkit-box-shadow:0 1px 3px rgba(0, 0, 0, 0.25);
      box-shadow:0 1px 3px rgba(0, 0, 0, 0.25);
      background:scroll 0 0 #222222;
      border-bottom:1px solid rgba(0, 0, 0, 0.25);
      color:#FFFFFF !important;
      cursor:pointer;
      font-weight:bold;
      line-height:1;
      overflow:visible;
      font-size:17px;
      padding:8px 19px 9px;
      position:relative;
      text-decoration:none;
      text-shadow:0 -1px 1px rgba(0, 0, 0, 0.25);
      width:auto;
      }
      .demobutton {
      background-color:#999999;
      text-align:center;
      width:100px;
      }
      .demobutton:hover {
      background-color:#EB7D05;
      }
      .downloadbutton {
      background-color:#999999;
      text-align:center;
      width:100px;
      }
      .downloadbutton:hover {
      background-color:#00AC00;
      }
      .homebutton {
      background-color:#999999;
      text-align:center;
      width:100px;
      }
      .homebutton:hover {
      background-color:#1666DC;
      }
      .button:hover {
      -moz-box-shadow:0 1px 11px rgba(0, 0, 0, 0.45);
      -webkit-box-shadow:0 1px 11px rgba(0, 0, 0, 0.45);
      box-shadow:0 1px 11px rgba(0, 0, 0, 0.45);
      }
      3. Save your Template....

      STEP 2. How To Use Live Demo, Download Buttons in your Post


      To display this customized buttons to your post you only need to add the following code in the "EDIT HTML" section of your Blogger Editor,

      For Live Demo Button
      <a class="demobutton button" href="YOUR DEMO LINK HERE" rel="nofollow" style="float: left;" target="_blank"><span style="display: inline-block;">Live Demo</span></a>
      For Download Button
      <a class="button downloadbutton" href="YOUR DOWNLOAD LINK HERE" rel="nofollow" style="float: left;" target="_blank"><span style="display: inline-block;">Download</span></a>
      For Homepage Button
      <a class="button homebutton" href="YOUR HOMEPAGE LINK HERE" rel="nofollow" style="float: left;" target="_blank"><span style="display: inline-block;">Homepage</span></a>
      For Download Button In Center
      <div style="text-align: center;">
      <span style="display: inline-block;"><a class="button downloadbutton" href="Link Here" rel="nofollow" style="" target="_blank">Download</a></span></div>
      For Next page and Prev page
      <div style="text-align: center;">
      <span style="display: inline-block;"><a class="button downloadbutton" href="Link Here" rel="nofollow" style="" target="_blank">Next Page</a></span><a class="button downloadbutton" href="Link Here" rel="nofollow" style="" target="_blank">Prev Page</a></span></div>

      You just need to replace YOUR LINK HERE, with your Live Demo Link, Download Link and Homepage link. And you can also change text to display with your text.

      That's..... Enjoy!
      Read More ->>

      Games

      Action
      Racing
      Mission
      Disney
      Adventures
      Fighting
      Cricket
      FootBall
      Tennis
      Table Cell
      Table Cell
      Table Cell
      Table Cell
      Table Cell
      Table Cell
      Table Cell
      Table Cell
      Table Cell
      Table Cell
      Table Cell
      Read More ->>

      Softwares

      Read More ->>

      Monday, 25 February 2013

      WinZip Pro v16.5 build 10096 (32bit) with Key Free Download Full Version

      WinZip Pro

      What is WinZip?
      WinZip is the world’s most popular file compression software with over 20 years of experience as the industry leader. No other file compression utility offers such an innovative and easy-to-use feature set!

      Zip files
      Compressing files is the perfect way to help you stay organized, share information easily, and get your work done faster!

      Organize thousands of files into small, manageable packages
      Save storage space and fit more onto portable media
      Improve uploading/downloading times and reduce bandwidth usage
      Send smaller, faster email attachments with fewer server issues
      As the world's #1 zip utility, WinZip is the best choice for your file compression needs.

      Zip files instantly with one-click and drag-and-drop functionality
      Retain folder structures and file relations as you zip and unzip
      Open all major compressed file formats
      Preview a compressed file without having to unzip it first
      Create self-extracting Zip files for recipients who may not have compression software
      WinZip compresses files into the following formats: Zip, LHA, and Zipx (our smallest file format to date).
      Not sure which format to use? Let WinZip select the best compression method for you!

      Did you know? WinZip also provides advanced image compression! With a single click, you can compress your digital photographs and graphic images by 20 - 25% with no loss of quality or data integrity. Now you can send photo albums easily and fit more onto your flash drive, CD/DVD, or hard disk.

      Unzip Files
      WinZip can extract content from the industry's widest selection of compressed file types!

      Zip (.zip)
      Zipx (.zipx)
      RAR (.rar)
      7Z (.7z)
      BZ2 (.bz, .bz2, .tbz, .tbz2)
      LHA/LZH (.lha, .lzh)
      Cabinet (.cab)
      Disc Image (.img, .iso)
      TAR (.tar)
      GZIP (.gz, .taz, .tgz)
      Compress (.tz, .z)
      UUencode (.uu, .uue)
      XXencode (.xxe)
      MIME (.b64, .mim)
      BinHex (.bhx, .hqx)
      Most other compressed files

      Did you know? WinZip's previewing functionality also lets you browse the contents of other major compressed file formats before unzipping them. WinZip can also convert other file formats into Zip format.

      Encrypt Files
      Encrypt and password-protect your files as you zip them, all in one easy step! WinZip provides powerful AES encryption to help you secure sensitive data from unauthorized access. You can even define your own password policies that WinZip will enforce for you.

      Did you know? WinZip auto-wipes or "shreds" temporarily extracted copies of encrypted files using the U.S. Department of Defense standard (DoD 5220.22-M). This automatic action prevents protected files from being recovered and misused.

      Share Files
      Compressed files are ideal for sharing your work!

      Zip multiple files into a single, logical package that is ideal for distribution
      Enjoy faster uploading/downloading times when you compress your files first
      Send smaller email attachments that transfer faster and cause fewer server issues
      Zip files into smaller sizes for sharing on portable media
      WinZip maximizes these advantages with several innovative file sharing tools:

      Avoid email size limits and send large files (up to 2GB) with ZipSend™
      Zip and post any type of file directly to Facebook® with ZipShare™
      Zip and email files directly from the WinZip window without opening your email account
      Reduce JPEG images by 20-25% before zipping and emailing them, all in one simple step
      Did you know? WinZip provides extensive support for most email and webmail services (Microsoft Outlook, Yahoo! Mail, Gmail, Hotmail). Once configured, you can zip and email files using virtually any email address.

      Back Up Files
      WinZip Pro includes an automated data backup facility to help you protect against loss. Back up your desktop, documents, pictures, and email so that you never lose a thing!


      Back up any important data using pre-defined jobs
      Create custom backup jobs using WinZip's simple wizard
      Schedule backups to run automatically and unattended
      Burn your backup data to CD/DVD or network drive
      Email your backups off site from virtually any email address
      Upload your backups to an off-site server using the built-in WinZip FTP client
      WinZip can even send you automated email notifications upon backup job completion!


      This is Utorrent file. You must be install µTorrent in your system. Download torrent click above Download button.
      Read More ->>

      WinSnap 4.0. Free Download Full Version


      WinSnap is image capturing tool that is carefully crafted to provide best possible user experience and options while taking and editing screenshots. Powered by engine that can easily capture screens even with transparent non-rectangular surfaces of Aero Glass on Windows 7 and Vista, it even has the option of adding numerous effects to the captured images, such as ye-candy shadows, reflections, outlines, watermarks, and color effects. WinSnap is fast, reliable, and comes with the built-in image editor.

      WinSnap Feature Highlights

      Non-rectangular shapes and rounded corners
      WinSnap can easily take screenshots of non-rectangular and transparent windows and add real smoothing drop shadow effects on-the-fly.

      Unique 'Application' capture mode
      WinSnap can enumerate and capture all visible windows in the foreground application and combine them into one screenshot. All void space between separate windows can be automatically filled with the background of your choice.

      Region selection
      Using WinSnap, you can define just a portion of the screen to capture. This is a good way to show a particular part of a website you have found on the Internet.

      Watermarks
      You can quickly add your signature to the captured snapshots, so everyone will know that it is your image.

      Thumbnails and scale option
      With WinSnap, you can easily create small thumbnails and automatically resize images to fit the fixed size of your pages.

      Pulldown menus for tutorials
      WinSnap can easily capture complex application pulldown menus in order to show a user which menu item to select when performing certain actions.

      Additional effects
      WinSnap can also be used to add certain effects to web graphics. This is another small way to improve your pictures and photos.

      Summary
      WinSnap has a great number of features. For an image editing program, it only takes a small amount of system resources. And it is only one 100kb application – which is smaller than Paint.
       WinSnap 4.0.5 Screenshot 1WinSnap 4.0.5 Screenshot 2WinSnap 4.0.5 Screenshot 3WinSnap 4.0.5 Screenshot 4
      Read More ->>

      Crysis 2 PC Game Free Download Full Version


      Crysis 2

      Crysis 2 is set in New York City in 2023 (three years after the events of the first game), which has since been evacuated due to alien infestation. Similar to its predecessor, Crysis 2 provides freedom to customize weaponry and abilities. Crytek wanted to avoid making another game set in a jungle environment, as were Far Cry and Crysis; New York City has been dubbed an “urban jungle”. The urban atmosphere offers more options in how to progress and plan attacks. Players are able to navigate between floors and buildings, as well as a destroyed cityscape.
      Crysis 2 bears the weight of heavy expectations on its shoulders. PC gamers want a new system-crushing game to show off their hardware, and console players were promised the "best-looking game ever." In the wake of Modern Warfare's ascension, Crysis fans worried that the series' expansion to consoles would lead to a narrow, dumbed-down experience.
      Set in a 2024 that seems more like the day after tomorrow, Crysis 2 depicts New York City, under assault from all directions. A bizarre virus is devouring entire boroughs; the city is under uneasy martial law, brought about by a strained partnership between the military and private security conglomerate Crynet. Then the alien invasion begins, and things fall apart. As a marine named Alcatraz (Callsign? Codename? Rude parents? Crysis 2 never says), you arrive amidst devastation and chaos, sporting Crysis' trademark Nanosuit -- a semi-living suit of combat armor with advanced AI.
      The Nanosuit is the lens through which you view Crysis 2, and it adds a great sense of cohesiveness to the game. Once you hit the Start button, everything you see and do -- save for load screens -- occurs in first-person view. Instead of wading through weapon- and power-selection menus, you're presented with in medias res overlays and subtle visual effects, which indicate the Nanosuit's status. The Nanosuit has three modes: Stealth imparts near-invisibility; strength grants more powerful melee attacks, greatly increased movement speed, and jump height; and armor makes you something of a walking tank. Each power drains your suit's energy to varying degrees -- and Crysis 2's foundation lies in juggling these powers, finding new ways to combine them, and using them in unexpected ways.
      It's great, then, that Crytek presents such a varied playground in its torn and broken New York City. Crysis 2 shines most when you push the Nanosuit to the limits of what you think it can do, and the best moments come from points where you stop and ask "did I really just pull that off?" Crysis 2 is a collection of sandboxes, some enormous in size, all laid out to provide multiple options for tackling your objectives. Your suit's AI identifies strategic points of interest if you choose, allowing you to mark tactical points or elements, like weapon caches and enemy locations. After that, it's up to you: Will you crank up your armor, tear a mounted machine gun off its hinges, and walk through the front door? Or will you sneak in to flank an enemy position, silently murdering foe after foe.

      Crysis 2's enemy AI is smart, yet believable. Sure, you can set enemies up for ambushes, but carelessness often provokes massive coordinated responses that require quick thinking to deal with. Combat usually spirals out from the initial encounter randomly, and most fights unfold differently each time you play them. Thank Crysis 2's environments, which aren't just wide, but also tall -- you can always find a way up and over, a way to come crashing down. When you fight Crynet's paramilitary forces, the ability to strike from on high and disorient your opponents is empowering and predatory. During encounters with the alien Ceph, the balance shifts; your attention isn't just on where you can go, it's where your more mobile foes can cut you off and ambush you. While you're the cliched one-man army, the tools at your disposal are primed to enable clever play more than brute force. The free-wheeling weapon customization from the original Crysis has returned, which allowed you to modify weapons with scopes, silencers, undercarriage attachments and such, and it's been joined by Nanosuit upgrades. The suit upgrade menu is actually your hand - twitching each finger selects a different subset of upgrades, and only one of each subset can be active at once.


      • System= Pentium D CPU 2.8 GHz
      • RAM= 1 GB
      • Video Memory= 256 MB
      • Size= 12.13 GB
      • OS= Windows XP, Vista, 7 and 8

      Torrent Download

      Download
      This is Utorrent file. You must be install µTorrent in your system. Download torrent click above Download button.
      Read More ->>
      Powered by Blogger.