Wednesday, 27 February 2013

How To Add Animated Favicon In Blogger?


How to Create Animated Favicons ?


1. Go to favicongenerator
2. And just at the bottom of the page upload your blog logo, image or icon you wish to make as
    your favicon and also add your blog or website title as the scrolling text. You will find all
    the help at favicongenerator


3. Press the Generate Favicon Button and you will go to other page like this,


Here you will see many images just right click the animated one and save it to your computer.

4. Now upload the image to your Image hosting account.like Picasa , shareapic , Photobucket etc. what is the correct URL of ur image.


How To Add Your Favicon To Blogger


1. Go to blogger > Design > Edit Html
2. Press Ctrl+F search for <b:skin>
3. copy the code which is shown below and paste before the <b:skin>

<link href='ADD YOUR FAVICON LINK HERE' rel='icon' type='image/gif'/>

4. Replace ADD YOUR FAVICON LINK HERE with the image URL of the favicon you uploaded

5. Save your template and you are done!

Read More ->>

Links Hover and Rollover Effects for Bloggersbl


Add an identity to your Blog by customizing the text links in your post title/posts and sidebars with nice rollover effects, colors and highlights. Learn how to remove the underline under the links. For the purpose of this article, I have changed my template such that you will see a different text colors when your cursor is over the links, and highlighted background color when the cursor is over the post title. In this article, we shall discuss the common effects that you can create for your Blog.

Change Blogger Post Title


If you want to change link color, visited link color or hover/mouse over style for the post title.
Go to Blogger > Design > Edit Html search for                       (Tip: Press CTRL+F)
.post h2 a
and add the styles and effects after that...

Add link style in blogspot body search for              (Tip: Press CTRL+F)
a {

Overview of Link Styles


Blogger templates use Cascading Style Sheets (CSS) to define how the pages should be displayed. There are four basic style sheet entities for links;

a:link { }
a:hover { }
a:visited { }
a:active { }
a:link defines the style for links such that they stand out from the rest of the normal text.
a:hover defines the style readers see when their cursor or mouse moves over the links.
a:visited defines the style for links that have been Clicked or Visited.
a:active defines the style to an activated element.
The common rollover effects and styles that can be inserted into the {  } are;

color: #xxxxxx;
Changes the color of the text. By far the most common and effective style. For a list of color codes to be inserted in the xxxxxx, Color Code Generator and Color Wheel

text-decoration: none;
text-decoration: underline;
text-decoration: overline;
text-decoration: line-through;
text-decoration: blink;
Set to "none" to remove the underline under the link. Set to "overline" if you want a line above the text or set to "underline" for a line below the text.

font-weight: normal;
font-weight: bold;
font-weight: bolder;
font-weight: lighter;
By default, the font is "normal", So there is really no need to set it as that unless all your text is in a bold font and you want your hover links to be in the normal font.

font-style: normal;
font-style: italic;
A common style used is "italic" for the hover links.

font-family: Verdana,Arial;
The "Verdana,Arial" font is just an examle. You can insert the font family names or generic family names that you want as the typeface for the links.

font-size: 85%;
font-size: 10px;
font-size: small;
font-size: medium;
font-size: large;
font-size: smaller;
font-size: larger;
For percentages and fixed font size, you can specify the values accordingly.

background-color: #XXXXXX;
With this, the background of the text link will be highlighted. Color Code Generator and Color Wheel

text-transform: uppercase;
text-transform: lowercase;
This changes the letters of the link either to uppercase or lowercase.

border-style: none;
border-style: hidden;
border-style: dotted;
border-style: dashed;
border-style: solid;
border-style: double;
border-style: groove;
border-style: ridge;
border-style: inset;
border-style: outset;
This gives you a border around the link.

border-color: #XXXXXX;
If you have a border, you may want to specify the color of the border.Color Code Generator and Color Wheel


Change Link Styles in Template


Under Template: Edit HTML You will be able to find the first 3 stylesheet entities or lines that look like these:-

a:link {
color: #xxxxxx;   < default link color
text-decoration:none;
}
a:visited {
color: #xxxxxx;   < visited link color
text-decoration:none;
}
a:hover {
color: #xxxxxx;   < hover / mouse over color
text-decoration:underline;
}
Changing these 3 will do significant wonders to the appearance of your Blog. you can adjust the colors of the links, visited links, and hover links through Template > Fonts and Colors. You can manually insert the color values too. Look at these examples and see the effects to understand what you can do to your Blog.

EXAMPLE 1
a:link {
color: #0080ff;
}
a:visited {
color: #e10000;
}
a:hover {
color: #289728;
}


EXAMPLE 2
a:link {
color:#0080ff;
}
a:visited {
color:#e10000;
}
a:hover {
color:#289728;
font-size: 120%;
}
In addition to the green, this link is also bigger font when your mouse over it


EXAMPLE 3
a:link {
color: #0080ff;
}
a:visited {
color: #e10000;
}
a:hover {
color: #2D8930;
font-family: monospace;
font-weight: bold;
font-size: 120%;
background: #ffff66;
text-decoration: blink;
}
This hover link has a combination of styles a different font family, bold and bigger font, highlighted background, and it blinks when you hover the mouse over it
Read More ->>

How To Change Heading Style In Blogger


Customizing Heading Style Using Simple CSS


Add one of the above Heading Style to your Blogs, do the following,

Go to Blogger > Design > Edit HTML
Search for ]]></b:skin> (Tip:- Press Ctrl + F)
Just above ]]></b:skin> paste one of the codes below,

For Heading Style with a bottom border, use this code,
.post h4{
color:#0080ff;
border-bottom:1px solid #289728;
font-size: 12pt;
padding:2px;
}

For Heading Style with a border at top and bottom, use this code,
.post h4{
color:#0080ff;
border-top:1px solid #289728;
border-bottom:1px solid #289728;
font-size: 12pt;
padding:3px;
}

For Heading Style surrounded by borders, use this code,
.post h4{
color:#0080ff;
border:1px solid #289728;
font-size: 12pt;
padding:2px;
}

For Heading Style with Hover Effect, use this code,
.post h4{
color:#0080ff;
border-top:1px dotted #289728;
border-bottom:1px dotted #289728;
font-size: 12pt;
}
.post h4:hover{
border-top:1px dotted #0080ff;
border-bottom:1px dotted #0080ff;
background-color: #289728;
color:#fff;
}

For Heading Style surrounded by a Box, use this code,
.post h4 {
border-bottom: 1px solid #289728;
color:#0080ff;
font-size:12pt;
}
.post h4 span {
position: relative;
left: -0.3em;
bottom: -0.6em;
padding: 1px 0.5em;
margin: 0;
border: 1px solid #289728;
background-color: #fff;
}

For Heading Style with a side Image & Hover Effect, use this code,
.post h4 {
background: #fff url(URL OF Side Image) top left repeat-y;
font-size: 12pt;
color: #0090ff;
padding:28px 0 0 44px ;
}
.post h4:hover {
color: #289728;
}
Make sure you replace URL OF SIDE Image Link of your preferred side image.This image can be 45px by 45px in size or even smaller. Now save your template.......

Customization and Implementation of The CSS Code for Headings


All the CSS codes above use simple properties which are described below,

For Changing border width, style and color edit codes  border:1px solid #0080ff
1px refers to border thickness/width and solid refers to border style and the six digit number refers to border color. you can change border style from solid to dotted or dashed. You can use color code generator for getting the six digit number for your desired color.

For Changing Font Size, edit codes like this one,   font-size:12px

To Change Font Color, edit similar codes like this, color:#0080ff  You can use Color Code Generator and wheel

Implementation:-
Now whenever you write a heading in your post inside blogger editor, simple add following pieces of codes next to your heading.
<h4>Your Heading Goes Here</h4>
NOTE:- Changes will not appear inside blogger editor or on previewing. You will only see a bolded black text inside blogger editor. The Styling will take effect only when the post is published.


For Heading Style Surrounded By a Box you will need to add slightly different code as show below,
<h4><span> Your Heading Goes Here </span></h4>
You only need to add an extra span tag, for the box to appear.
Read More ->>

How To Make HTML Tables In Your Blogger/Website


How To Make Table?
  1. First you Click on Quackit For Generate HTML Table Code
  2. Now Follow Image For learn in Detail


  1. Change border colour to click on choose colour
  2. Now Change number of rows i.e 2 , 9, 6 etc
  3. Leave the Cellspacing Box
  4. Change the number of coloumns according to your requirements
  5. Leave the box Cellpadding
  6. Now you
    can change the value of border shadow if you select 1 then shadow will
    appear if select 0 valur then border will not show
  7. Choose the Border colour by clicking on Choose Colour and select your favourite colour
  8. After doing above work then click on Generate Table Button
  9. Preview will be appear below Generate Table Button
  10. Now you can copy the Code Which contain HTML Language
I have paste here the table code of  5 rows and 3 coloumn With White Colour 

    <table border="1" bordercolor="#FFFFFF" style="background-color:#FFFFFF" width="100%" cellpadding="3" cellspacing="3">

        <tr>

            <td>Table Cell</td>

            <td>Table Cell</td>

            <td>Table Cell</td>

        </tr>

        <tr>

            <td>Table Cell</td>

            <td>Table Cell</td>

            <td>Table Cell</td>

        </tr>

        <tr>

            <td>Table Cell</td>

            <td>Table Cell</td>

            <td>Table Cell</td>

        </tr>

        <tr>

            <td>Table Cell</td>

            <td>Table Cell</td>

            <td>Table Cell</td>

        </tr>

        <tr>

            <td>Table Cell</td>

            <td>Table Cell</td>

            <td>Table Cell</td>

        </tr>

    </table>
    <p style="font-family:verdana,arial,sans-serif;font-size:10px;"><a href="http://www.quackit.com/html/html_table_tutorial.cfm" target="_top">HTML Tables</a></p>


    • Now goto your post area and click on HTML Button then paste above HTML Table Code As shown in Below Image
    • After that click on Compose Button and result will be show as shown in below image


     Demo Here

      Table Cell Table Cell Table Cell
      Table Cell Table Cell Table Cell
      Table Cell Table Cell Table Cell
      Table Cell Table Cell Table Cell
      Table Cell Table Cell Table Cell


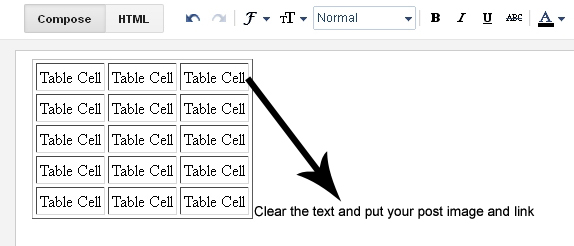
      • Now you should customize the table for put your software,games or etc post in table
      • Follow Images
      • Remove Table Cell text and put your Post
      • Table automatically expand when you put your image in table


      • Enjoy and Like us on Facebook for Recieve daily updates
      Read More ->>

      Tuesday, 26 February 2013

      How To Add Fancy Buttons in BloggerBl


      Links are very common on blogs, But many blogger's don't realize the power that they have with CSS to manipulate and manage their links effectively.

      This article will show you how to create Live Demo, Download, Homepage fancy buttons using simple CSS. It is much better to use this technique than to use image buttons because you can apply the style to any link and at the same time you don't have to create an image for each button which makes your blogs take longer to load. There is a CSS style that can help you create a button like effect easily with CSS.


      STEP 1. How To Add Live Demo, Downlaod Buttons To Blogger


      1. Go to your Dashboard > Edit HTML
      2. Search for ]]></b:skin> before it paste the following CSS Code.
      .button {
      -moz-border-radius:5px 5px 5px 5px;
      -webkit-border-radius:5px 5px 5px 5px;
      border-radius:5px 5px 5px 5px;
      -moz-box-shadow:0 1px 3px rgba(0, 0, 0, 0.25);
      -webkit-box-shadow:0 1px 3px rgba(0, 0, 0, 0.25);
      box-shadow:0 1px 3px rgba(0, 0, 0, 0.25);
      background:scroll 0 0 #222222;
      border-bottom:1px solid rgba(0, 0, 0, 0.25);
      color:#FFFFFF !important;
      cursor:pointer;
      font-weight:bold;
      line-height:1;
      overflow:visible;
      font-size:17px;
      padding:8px 19px 9px;
      position:relative;
      text-decoration:none;
      text-shadow:0 -1px 1px rgba(0, 0, 0, 0.25);
      width:auto;
      }
      .demobutton {
      background-color:#999999;
      text-align:center;
      width:100px;
      }
      .demobutton:hover {
      background-color:#EB7D05;
      }
      .downloadbutton {
      background-color:#999999;
      text-align:center;
      width:100px;
      }
      .downloadbutton:hover {
      background-color:#00AC00;
      }
      .homebutton {
      background-color:#999999;
      text-align:center;
      width:100px;
      }
      .homebutton:hover {
      background-color:#1666DC;
      }
      .button:hover {
      -moz-box-shadow:0 1px 11px rgba(0, 0, 0, 0.45);
      -webkit-box-shadow:0 1px 11px rgba(0, 0, 0, 0.45);
      box-shadow:0 1px 11px rgba(0, 0, 0, 0.45);
      }
      3. Save your Template....

      STEP 2. How To Use Live Demo, Download Buttons in your Post


      To display this customized buttons to your post you only need to add the following code in the "EDIT HTML" section of your Blogger Editor,

      For Live Demo Button
      <a class="demobutton button" href="YOUR DEMO LINK HERE" rel="nofollow" style="float: left;" target="_blank"><span style="display: inline-block;">Live Demo</span></a>
      For Download Button
      <a class="button downloadbutton" href="YOUR DOWNLOAD LINK HERE" rel="nofollow" style="float: left;" target="_blank"><span style="display: inline-block;">Download</span></a>
      For Homepage Button
      <a class="button homebutton" href="YOUR HOMEPAGE LINK HERE" rel="nofollow" style="float: left;" target="_blank"><span style="display: inline-block;">Homepage</span></a>
      For Download Button In Center
      <div style="text-align: center;">
      <span style="display: inline-block;"><a class="button downloadbutton" href="Link Here" rel="nofollow" style="" target="_blank">Download</a></span></div>
      For Next page and Prev page
      <div style="text-align: center;">
      <span style="display: inline-block;"><a class="button downloadbutton" href="Link Here" rel="nofollow" style="" target="_blank">Next Page</a></span><a class="button downloadbutton" href="Link Here" rel="nofollow" style="" target="_blank">Prev Page</a></span></div>

      You just need to replace YOUR LINK HERE, with your Live Demo Link, Download Link and Homepage link. And you can also change text to display with your text.

      That's..... Enjoy!
      Read More ->>

      Games

      Action
      Racing
      Mission
      Disney
      Adventures
      Fighting
      Cricket
      FootBall
      Tennis
      Table Cell
      Table Cell
      Table Cell
      Table Cell
      Table Cell
      Table Cell
      Table Cell
      Table Cell
      Table Cell
      Table Cell
      Table Cell
      Read More ->>

      Softwares

      Read More ->>
      Powered by Blogger.